This project is a robot that can be controlled remotely using a GUI on the computer

Fig 1: GUI to control the Robot

Fig 2 : The Robot
Block Diagram of the Project
Required devices and software
Hardware
- 2 x any Arduino Boards (I used 1 x UNO and 1 x Mega 2560). One of them is in the robot itself and the other is connected to the computer as the transmitter.
- 2 x nrf24l01 wireless transceiver modules (one in the robot and other one connected to the computer trough Arduino Serial communication)
- Robot Chassis with DC motors (you can easily buy them online. Click here to view some on ebay)
- Motor Driver to drive the 2 x DC motors (I used a l298n motor driver)
- A Battery (batteries) that is(are) powerful enough to power the hardware(both arduino+motors+other devices. I used 8xAA NIMH batteries).
- Jumper cables (wires) to connect the devices together.
Software
- Qt Creator (or any other IDE with Qt C++ plug-in, which is capable of creating GUI applications). You can download and install Qt Creator from their website; Click here to go to the download site.
- Arduino IDE
- RF24 library for the nrf24l01 wireless transceiver. You can Download it from here
Setting up the robot
- Arduino Mega 2560 has been used in the robot.
Connecting the nrf24l01
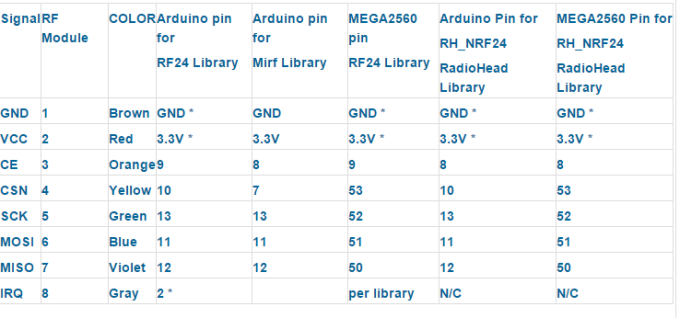
You can find how to connect the nrf24l01 to your arduino through here(see pinout and connections for the RF24 library) or see the figure below.
Fig 3 : Arduino Connection to the nrf24l01 module for different libraries
Note : Vcc is connected to 3.3v NOT 5v.
Connecting the Motor Driver (L298n)
- Power up the l298n with a battery ( 5v <Voltage ≤35V). See Fig 4.
- OPTION 1: Connect 5V output from the l298n to the Aruino Vin (Voltage input) pin in order to power up the arduino.
- OPTION 2:Power arduino with an external supply.
- Connect grounds (GND) of all the devices and power supplies together.
- Connect IN1-IN4 to any digital pin on Arduino and ENA & ENB to any two pwm pins.
Example Connection with Arduino (Mega 2560)

Fig 4 : Arduino Connection to the l298n motor driver
- Finally place the Arduino and connected devices on to the robot chassis(see the image below)

Fig 5: Aruino and other devices assembled on the robot chassis
Setting up the transmitting Arduino
- Arduino UNO is used for this
Connecting the nrf24l01
- Connecting nrf24l01 transceiver module is as described in Fig 3.
Note : Vcc is connected to 3.3v NOT 5v.
Setting Up the Qt GUI Application
Please watch the video explaining how to create the GUI application using the Qt creator by clicking here.
Note: If you are not familiar with Qt platform, please watch great Qt tutorials on VoidRealms
Programming
Programming the Arduino controllers
The Code for the Arduino on the Robot
The Code for the Transmitting Arduino
Programming the Qt GUI application
- Watch the video explaining some information on programing the Qt application by clicking here (NOTE: this video doesn’t explain how to code the whole application, but some basic setup before start coding.).
- The whole code for Qt robot GUI application
Click here to view the video of the project working
Improvements
- This Project can be designed such that the robot sends out information such as temperature,speed,data from ultrasonic sensors,etc to the computer and it is displayed on the computer screen
Bibliography
https://arduino-info.wikispaces.com/Nrf24L01-2.4GHz-HowTo
http://www.voidrealms.com/
https://www.youtube.com/user/VoidRealms
